A small crack at the flared metal portion on the factory installed starboard cockpit drain got me wondering about the possibility of water intrusion within the transom. As a remedy, I planned to re-bed the drain holes, then I built a simple set of stainless steel tubes to replace the factory ones. (See #1 Simple Drain.) While thinking about things and before doing any mounting, I came up with bronze drains. (See: #2 My First Real Drain Fix). A year later, I changed my mind and started to work on stainless steel drains mainly to get rid of the scum build up at the stern cockpit area. (See: #3 Scum-clean Fix.)

The factory drains are really thin brass-like tubes similar to the stainless one seen at the right except thinner material. It is so thin that they are able to simply bend a flare at each end. As mentioned before, due to slight movement of the stern section, the flare started to crack. A fix was due!
In the un-lableb picture on the right, you see one I took of a three-inch long section of 1" x .065" wall, 304 stainless tube. Originally I cut this piece and put a bead on one end to act like the flared outer end. I planned to cut it to the proper length before installing it.
'never used this method so if anybody wants a two hunks of tube, pay basic costs and they're yours!

The first picture shows my "specialized" removal tools. Any old hammer and a reasonably sharp cold chisel will do. Working from the inside I simply chiseled the side of the flare until it bent inward or was cut off. Afterwards much of it was bend inward and/or cut out of the way, it was easy to just making it smaller than the original one-inch hole and pull it out from the outside.
This was pushed out from the inside although I don't think it really matters which way it comes out. You could have cut or bent everything from the outside then knocked it inward too.
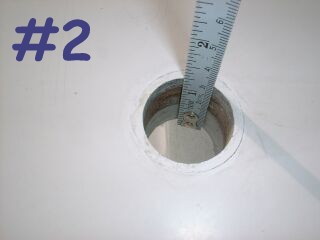
Looking at picture number two, you'll see that the stern was made 1-1/4 inch thick. Upon closer inspection you'll note that the factory only used about 1/2 inch thick wood and really thick fiberglass to strengthen it. My 120-pound, ten-horse four-stroke outboard had no problems hanging on it. Other than the small crack in the starboard drain, I've had no signs of flexing or weakness.
My boat is a '94. Being built nearly ten years prior to this writing, I felt it was time to replace the caulk anyway.
The original hole had a thin coating of Life Caulk, (good stuff also!), to protect the wood from water that migrated around the outside of the original brass tube. After I poked out both port and starboard tubes, I noticed the wood was starting to look weathered. It was showing signs of water sneaking in, but no rot was evident.
Next, I cleaned and scraped the old caulk away then went for dinner which gave the wood in the hole a long time to air dry. Later I took some 3M 5200 seal and wiped it inside thinly covering everything.


Being a hydraulic person by trade, I had previously grabbed two used, leftover 1" bronze hose fittings and modified them to look like proper drains. This was done by first cleaning them, cutting off the threaded portion and sanding the cut edge smooth. It's amazing how well old bronze cleans up. (To bad it doesn't stay clean!)
Using more of the 5200 seal, I liberally coated the entire "barbed" section then using a soft hammer, proceeded to knock it in place from the outside. The direction doing this does matter, as I wanted the larger section on the outside. Additionally it would have been difficult to swing the hammer from the inside with the force needed.
The seal material seemed to get everywhere. After wiping it off, things started to to look great. Using more 5200, I smoothed off both sides, then let it set for a few days. (See picture #3.)
Now I have two cockpit drains with new seal to protect the wood inside the stern. If I say so myself, the end result is not too shabby. (See picture #4.) For some reason bronze through-hulls, although fractionally heavier and not too noticeable, add that little extra something to the looks of my sailboat. It's sort of like common pin stripes on a car! Maybe it's a personal thing?
| Qty. | Description | Basic cost |
| 2 | 1" Bronze hose fitting | Free (If purchased new they would probably cost around $10.00 each.) |
| 1 | 3M 5200 sealant | About $8.00 (Unless you already have some for something else.) |
| 1 | Labor | Cut file/sand and apply sealant |
| Total time around 30 minutes and almost no cost. |
NOTE: If you've owned your 2023 for more than one rainstorm, you already know the factory installed deck drains are about a half-inch too high. That boils down to a perpetual residue of water, scum, mold growth, bird crap, and whatever else "Mother Nature" dumps in your boat. In other words, it becomes a cesspool!

After installing my first fix, using the bronze tube, I had talked to another owner and decided it was time to improve the drains again. This time it was to get rid of the scum buildup and to use stainless metal to match the rest of the boat's rigging. Additionally; the bronze drains tarnished very quickly turned nearly black from weathering.
The original stainless steel fitting came from a 1" hose fitting with pipe thread on the opposite end. Taking it to a band saw, I first cut the pipe thread end off. That end was not going to be used anyway. (See Letter "A" and "B")
Next I took them to a belt sander, smoothed off the wrench-flats and smoothed off the freshly cut ends, (See letter "B"). Letter "C" shows the final product.
Note: It would have been much easier and turned out much better if I had used a machine lathe. (I did just that afterwards.)
Warning: *If your not accustom to power machine, be very careful! If it can modify metal and/or wood, your skin can be also!
If your smart, you won't go through two pair of drains like I did, especially if you use 3-M's 5200 seal. That stuff it near permanent! I doubt if many sailboaters have put another drain set in like I did so read the following. Then jump-back to the bronze fitting section above to fill in the blanks but pretend it's talking about stainless steel.
Now that you have removed the other drains; grab a file and enlarging the hole DOWNWARD. This is the trick to get the drain low enough to let all the water drain out and not build up as scum. If your wondering about the shape of the hole, that's OK but you need to first be concerned about getting the drains low enough. Then go fractionally lower still!
Going lower allows you to use thickened epoxy to seal the inner portions of the stern, sort-of like a proper throughbolt. After the basic epoxy seal has hardened, file out a hole big enough for the stainless drains and remember to have them just lower than the cockpit deck to allow full drainage. Also remember to be careful not to chip the gelcoat. It can be easily repaired but why make more work if it's not needed?
From here it's just about the same as listed for the bronze drains listed above.
After everything hardens, work on beautify the outer parts with new gel coat and/or a good white seal.
That's it! No more scum build up! Well, at least very little.
| Qty. | Discription | Basic Cost (Spring 2005 Cost) |
| 2 | One inch stainless steel hose end to pipe thread fitting | *About $12.00 each. |
| 1 | Epoxy/hardener/Gel-coat | Depends on the amout purchased. ($60?) West System sells a small $10.00 kit at West Marine Stores that is just enough. |
| Labor, (about an hour plus dry time.) | ???? | |
| Tools | ???? |
Tmay be a first! In my years of looking at boats, I've never seen a hatch board like what is now on my boat. After years of sanding my weather beaten boards I wore through the teak skin. My choice was to make new ones, make new type boards, or find a way to cover the bad wood. Guess what I did? It's pretty simple, just a poster, and shows my affection for my daughter and her love of Dolphin. It's really pretty neat and everyone I show it to loves it!

When I decided to cover the wood my first thing was to either paint a picture on or find a poster to stick over it. My wife Martha suggested I take a picture of a really nice picture of the interior of a large sailboat and put that on. It was a great idea but one day while in a Walmart department store we both saw a great pictures of dolphins with sunglasses and both of us knew that was the one!
Now I had to find a way to put the picture on the wood, durable and reliable. One of my friends suggested using epoxy and making something like many bar tables have. This would be a great thing that would probably out last the boat it self! My problem was that it would also be a big time problem to do, the cost would be very high, I could mess up and have to start all over, and the boards themselves could end up to thick to fit in the slots. I decided to put that thought way back on the back burner and look for another method.
All I wanted to do was to decoupage the poster onto wood. After visiting a local Michaels arts and craft store to get some ideas, I found they had a good one! It was called "dry mounting". That was gluing the poster onto the wood by using vacuum and 190 degrees of heat. It seemed good so went for it!
After cutting and trimming everything, the store employee put everything into a large "Vac-U-Form-like" machine, (about three by five foot). The machine then sucked out all the air and applied 190 degrees of heat. The vacuum caused the poster to be pushed onto the wood without any air bubbles and the heat melted the glue-like stuff between the poster and the wood. The end result was a picture that almost had a wood grain finish to it. A small amount of final trimming and the boards were ready for my to take home.
When I got home, I found that I didn't have the right topcoat so I went to a Lowe's store and picked up two spray cans of spar urethane. This has all the right stuff. It is very-very durable, protects from sunlight, will not yellow or darken with age, resists rain, moisture, and temperature changes. Only a couple of problems I thought about. It takes a long time to dry and it's not recommended over waxes-polishes etc. or over lacquer & shellac finishes. No problem for me but I did put a tarp over the hatch-hole to keep the weather out of my cabin.
The end results looked pretty good. Now I've got something that really personalizes my boat for everyone else to see. Like I said before; "I've started a new fad!"
| Custom Hatch Boards | (2003 price) |
| Minwax Helmsman Spar Urethane Clear Gloss | $6.00 |
| Dry Mount process (Performed by store) | $14.00 |
| Hatch Boards | (All ready had 'em) |
| Total price=about $20.00 dollars. | |
Most sailors carry an anchor aboard their ship. The obvious storage place is somewhere up front. On the C-model 2023's, the factory made an anchor storage locker directly in the bow. My boat is an A-model, which didn't come with that way. Several owners have come up with good ways to store the anchor and rode. Clark sent me his method to share with you.

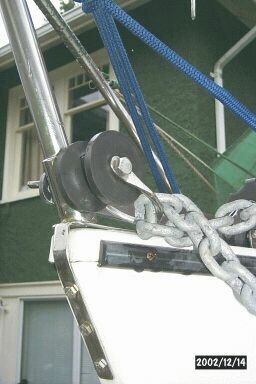
Clark has done a wonderful job on his A-model by hanging the hook on the bow pulpit. His anchor is a Danforth type and is fastened using Velcro straps. From there the chain goes through a nicely modified roller assembly he placed on the bow. From there tthe rode is finalized in his red storage bag.
Looking at the twisted chain, my origional thought was a twisted chain that was placed on the roller backwards. When I thought about it more, the steel bail pivots forward and the chain becomes "normal" looking. *(I should have never doubted his design!)
Clark told me he took a pipe cutter to scored the bolt's shaft. That allowed an external circlip to fit into the groove that was created. This was done to maintain the proper action of the "knife-switch". You know, the one that is used to fastens the forestay base. This allows him to tighten the wing nut without pinching the anchor roller. (The cost of circlips are about a dime at hardware or industrial supply stores.)
The bail to stop the rode from falling off the roller is a bend-to-fit clevis. Don't you just love well engineered gadgets!
*As a side note everyone should know that attached to whatever type anchor you have, put a few feet of chain before you tie on the rode. One reason is to prevent wear on the line and the second is because the added weight of the chain causes the shank to drag more horizontally which, in-turn, puts the fluks into the ground faster and increases the holding power.
While in the trailering position, the mast has several lines and cables hanging around. After looking at the cost of pre-made tie-wraps and rubber cords to secure them from blowing around, I decided to do a little comparison shopping. "Let's see... A fancy pre-made cloth bungee wrap costs $2.50 and I'll need a bunch of them. At just over 50 cents a foot and using PVC, I'll save half the cost!"
After purchasing a 10 foot section of 1" PVC pipe and about 20 feet of 1/4" bungee cord, I cut several two inch long pieces of PVC and 10, two foot sections of bungee. Now I took each PVC piece and drilled two 1/4" holes close to each other. Now I took each bungee end and forced them from the outside inward, through each hole I just drilled. Now just tie the two ends together and pull them tightly in the middle of the PVC section. They look like a big rubber band.
Now I have two blue colored bungee cords for holding the sail cloth, and five red colored ones to hold the lines and cables.
This is another place where I saved allot of time during set-up/take-down. Those things are very quick and easy to use, albeit hard on the knuckles if you happen to let the "wrong" end fly loose. (Hint: Unless single handed, you'll learn fast to let the other person remove them.)

It may not be the easiest to see in the first picture but the original rear cleats were only five inches long plus they didn't have enough space for me to slip a loop of 3/8th line through the middle hole. Something I like doing when tieing up. I've finally got around to remedy things by swapping my cleats with something a little more substantial.
Earlier models already had two small cleats up front but my '94 model only had one up front to cover at dock and also for anchoring. With the new plan I'd have my original anchor cleat, one off the port bow, one off the starboard bow and two off the stern quarters.
Looking at picture #1 you'll notice a smaller hole between two larger holes. That was one of the two original holes used to hold the 5" cleat. Also note that both screws holding my original starboard cleat were bent. A precursor to breakage!

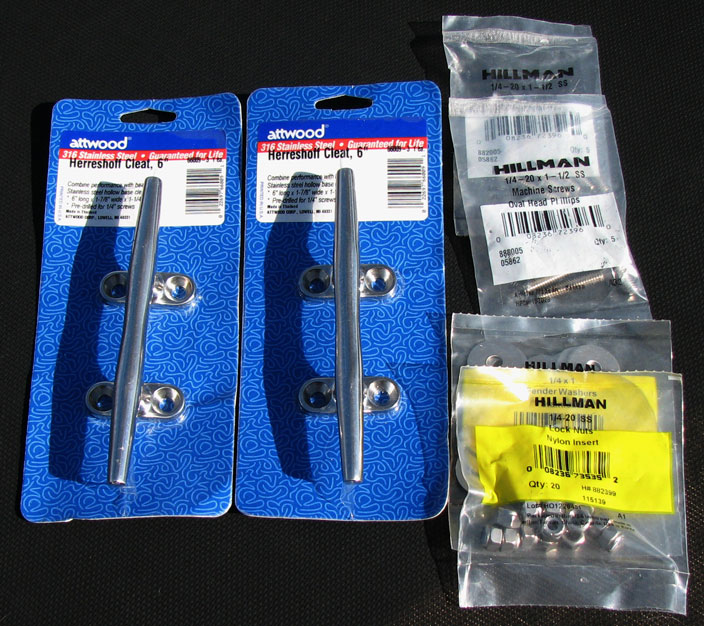
To start with, I found a source for Herreshoff style yacht cleats. They had either six or eight inch long cleats and provided lots of room to slip line under. Also each cleat had four larger bolts to hold it to the deck. The best thing was the price, less than $8.00 and located at, (of all places), a Lowes hardware store!
Because the price was almost half what marine stores were charging, I bought four 6 inch cleats. I compared both sizes and felt the larger eight inch size just looked too big on my boat.
You'll note the four holes for each cleat are large. This was done with a half inch drill bit so I could fill the holes with epoxy and have a permanent seal to prevent water from ever sneaking down the bolts sides and soaking the wood core of the deck.

The second picture shows something else I did to beef up the mounting. I got my Dremel moto-tool and filed some of the wood core away and left the top and bottom epoxy smaller. This was done to prevent the epoxy from even thinking about being pulled out like a plug! Just a little more security. (I mentioned else where that I like "over doing" things.)
One thing important! The third picture shows the four 1/2" holes from the inside. Originally I wanted the cleats to be closer to the side. Checking the measurements from the inside proved I couldn't. Now you see why sailers should always measure two or three times before cutting!
After taping wax paper to cover the holes, (Pic 3), I filled all four sets with epoxy but just under the top and lets it set for a couple days. Next I mixed up some gelcoat and topped off the hole.
After all the filling was done, I borrowed the same right angle drill I needed to cut the 1/2" holes to again drill holes but this time they were only 1/4" and again properly lined up to match the cleat pattern. The right angle drill was needed to clear the rear lifeline stansion. The front cleat had plenty of room for a regular drill motor to work properly. The rear was too close to the rear bar with out removing the entire bar and I didn't feel like doing that. The clouds were threatening so I put tape over the holes again to finish at a later time.

Before sealing the cleats, I placed them down over the holes and insert all four Phillips head, oval head shaped, stainless steel screws. (Remember, measure twice!) This was done just to be positive of a proper screw fit. Now is the time to find any slight misfit and using a small rat-tail file modify the holes. Now remove everything. Get some really fine sandpaper and cleaner to remove any oil, tape glue, hand sweat, gelcoat powder, etc. before using the 3M 4000 seal.
The bedding material was really nice. 3M just came out with their white colored 4000 seal, (Spring 2003). It's the neatest invention since the indoor outhouse! I purchased a small tube and went crazy with it but not until I outlined the cleat base with some plastic tape I had, very similar to electrical tape except it was clear, not black. If you look real close, you'll see the tape in picture four.

Should you re-bed your cleats, remember to coat inside the holes, most of the bolts, and both the gelcoat and the cleat base. Give the seal a few minutes to set before placing them together and inserting the bolts. Give it a few more minutes to gel together then get a wife or friend to hold the screws while you crawl inside to snug the stainless steel fender washers and Nyloc bolts.
While the bolts are tightened, the seal gets squeezed out. This is why you outline the cleat with tape first. Now that all is tight, call it a day or more. The seal takes a couple days to properly harden.
When I returned three days later, I experimented removing the excess seal with a razor blade. Trimming off the seal with the tape still stuck worked but I found it worked better if I removed the tape first. The seal will not stick to the tape so it came off with relative ease. Now I trimmed and scraped the seal off with less trouble. Unfortunately some of the seal got around the Phillips area so I had to scrape it off also. The last picture shows the almost finished project, almost because I still have to clean off the tape glue.
Item (Spring 2003) |
Quantity |
Unit |
Total |
| Cleats, 6" Stainless Steel, Herreshoff Yacht Design (Mfg.=Attwood, UPC=022697660091) | 4 | $8 | $32 |
| Screws, 1/4" x 20 x 1-1/2 long, Oval head, Phillips head, Stainless Steel | 16 | $.20 | $3.20 |
| Nuts, 1/4" x 20tpi, Nyloc, Stainless Steel | 16 | $.15 | $2.40 |
| Washers, 1/4" x 1-1/4", Fender Type | 16 | $.15 | $2.40 |
| Epoxy and Hardener (Smallest qty. possible. I figured this to be an investment towards the future.) | 1 Set | $35 | $35 |
| Gel Coat Kit (Smallest qty. possible. I figured this to be an investment towards the future.) | 1 Kit | $25 | $25 |
| Drill Bit, 1/4" Diam., High Speed Type (had around the house) | 1 | $4 | $8 |
| Drill Bit, 1/2" Diam., Forstner Bit | 1 | $10 | $10 |
| Right-angle Drill Motor (borrowed) (Aprox. cost to rent) | 1 | $50 | $50 |
| Wax Paper, Tape, Sand Paper, Tape-ruler, Razor Blade (Found around the house) (Aprox. cost to buy) |
(small qty) | $10 | $10 |
| Total Cost $178 (I don't think you'll be renting a right angle drill motor.) | |||
| If you only need to purchase the cleats and fasteners, then the price will only be around $40 | |||
Now I have five cleats total, four new cleats plus the heavy duty looking one the factory put up forward which I plan to use with the anchor system. They're also large and strong enough to let me feel confident about rafting up with other sailors and towing the occasionally stalled out powerboat back to shore!
The mast holding pole is mounted on the transom by the factory using four stainless wood screws. These screws are a little over 1/2" long and are doomed for failure.
After a good day on the water, I propped the mast on it during the normal de-stepping process. The screws ripped out of the transom and the mast landing on my foot. (Ouch!) After a few choice thoughts, I decided to made a larger 5x7" holding base and THROUGH BOLTED everything in the same area. It's not the fancy black anodized color supplied by the factory but I think plain aluminum looks good too.
Many sailboats make use of free space for additional storage. The picture to the right shows the extra storage in the starboard cockpit seating area with the port-side having the same arrangement. If you'll look real close, you just might notice a couple simple modifications I did to mine.

One of the first things I did was to add a lockable hasp that will keep the honest crook honest! I realize a screwdriver is all that is needed to break in to the storage locker but you have to admit most crooks are only going for the easy stuff. A small padlock will deter a quick look and "bad thought"! Generally I have no problems leaving my boat unattended.
One more thing; I normally fasten a rubber shock cord from the port to starboard hasps. The tiller is located directly between them and after one wrap of cord I find the tiller is lightly held in one position. I can still easily slide the tiller back and forth without the need to unwrap too.
My bumpers and anchors are in the port side locker with the fuel for my outboard held in the starboard one. Again looking closely you'll see two vents. A louvered one towards the front-inside and a cowl to the rear. Both will provide the needed ventilation required for an enclosed fuel containing space.
Both vents have three to four square inches of open "air passing" area. The rear cowl has an open hole which allows me to pass the fuel line out to the motor and the forward louver won't pass anything but air. They both still prevent water from entering the locker area. *(According to the rules; a three inch square ventilation is required so fuel vapors will not buildup. Although this has never been a subject of discussion, I'd rather be safe then sorry.)
One other thing. I have replaced both factory pivot hinge pins with a short piece of 1/8th inch stainless rod. The fell out and the other started to. After looking closer I found both of the factory installed hinges, on the starboard side only, were mounted about a 1/4 inch higher than they should have been. One on these days I'll fix it so they allow the seat to rest properly.
Until I patch and re-drill the holes lower, I obtained a few extra hinges. Being the original lasted four years, I'll have enough spares for over ten years. (Hey, they were cheap!)
Wondering how I could protect my nonskid deck, I heard about Aurora cleaning products and their Sure-Step for the nonskid portion. The product also provides a pressure sensitive coverage.
Following the factory application suggestions on their web site, (got mine at Boaters World), everything went well. That stuff works great and has UV protection built in to protect the gel coat!
The jib blocks were marking up my deck while trailering so I went to my local boat store and purchased a couple stainless springs. They only cost about 50 cents each. Now they both are held off the deck close to the normal usage position and now the blocks do not mark up deck.
They didn't have a spring small enough for my jib furling block so I just took another similar size one and bent the smaller portion a little... "smaller". Now it too stays off the deck. Everything now looks like I "borrowed" them from a larger ship.
![]()
Return to Home Port.
Mail to: The WebCaptain1@yahoo.com