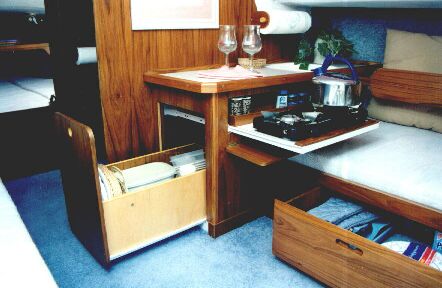
Here's an example of a beautiful interior. Steve added a few goodies to the stock C model interior. A wonderful job if I do say so myself!
Having water ballast we loose about a foot or so of head room. With the lower area I have to go about on my knees when below and have found that the carpet is a wonderful padding which prevents bruised-up body parts! Over the years I messed up my carpet. From spilling bleach to accidentally tracking in road tar. Finally I decided to replace the original with a simple indoor-outdoor type that I could use and not be so worried about re-destroying.
Looking through many stores, nothing was found. Carpet stores, department stores, remnant pieces, garage sales, (some of the colors people have are totally insane!), and just asking around. Nothing could be found that was inexpensive and able to hold up in a boat. All I wanted was a 6x8 foot piece that would work below but most only came in 5x7 foot pieces! In addition, everything else I found was in the price range of $40 to $100 bucks! Me not having the pocket change to buy it extended my search.
While looking through Lowes for some electrical supplies, mother nature called me to the washroom. While going there I noticed several types of carpet that just might work.
Upon returning, I checked out the various carpets and found a cheap but durable covering made for camp sites, decking covers, and most importantly - boats. This was great being that they were packaged in a bunch of colors and in 6x8 foot sections. I found one for less than $15.00 and took it home.
Every owner knows about the complex shape of the original carpet but I had a plan to simplify cutting the new piece to fit. After removing the new carpet from the box it came in, I laid it flat on my driveway face down, (Do this in a clean location.) Then I placed the original carpet on top of the new, again putting it face down. Now came the best part.
Going to my paint locker I grabbed a spray paint can, returned to the carpets, and proceeded to lightly spray the outline of the original on the backside of the new piece. After completing that, I threw away the old section and waited a few minutes for the paint to dry. The new had a near perfect cutout marking. Then it was just a matter of cutting it out and placing it in my cabin.
An occasional area was a little off but with minor shaping I was set to go.
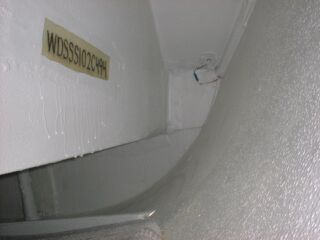
While crawling around the inner port-side stern section, guess what I found? The HIN marked on the deck section. That was probably done so the factory wouldn't get the deck section confused with another boat.
Imagine that, I never remember seeing it before!
*Since posting this article a few other owners have told me their boat did not have the inner HIN which I found. "Your mileage may vary!" :)
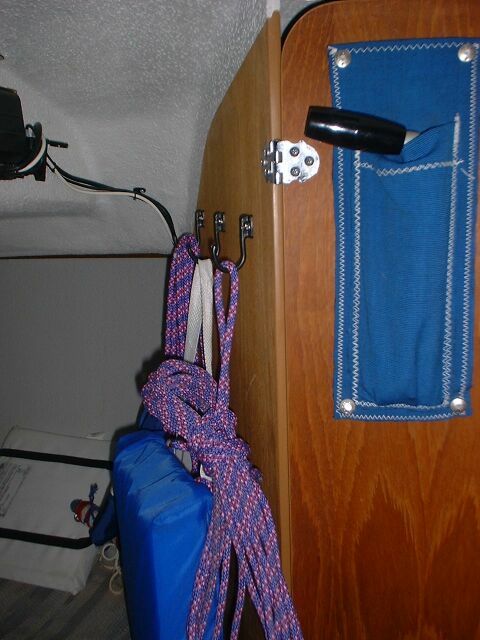
If you look closely in the bigger picture, the lines are being held on small black colored hooks. Those are made of plastic and origionally used for hanging weekly classified papers that get delivered on mailboxes. They are UV protected and soft enough not to mess up body parts should you bump into one.
They do seem a little on the weak side but I find that as long as I don't really overload the hooks, they work fine. The smaller picture shows my boathook being held using three more hooks.
As the WB filling gets near full, misty water bubbles out the air escape hole located in the cabin. Steve has come up with a simple and effective fix for this.
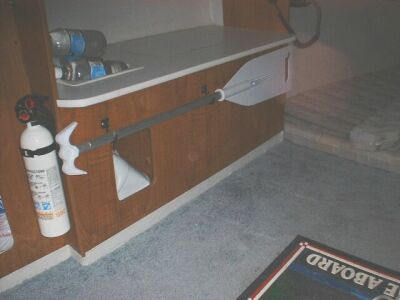
The slop catcher is a simple U shaped PVC pipe that catches the occasional water droplet that always squirts into the forward bilge on the "C" models. (*Having a different interior design on the "A" & "R" models, an droplet hits the carpet not in the bilge.)
After launching, when I am out tying up and finishing the rig, the catcher is doing it's thing. I can then go below, pull out the slop catcher, empty it, plug the hole, close the valve, and go sailing.
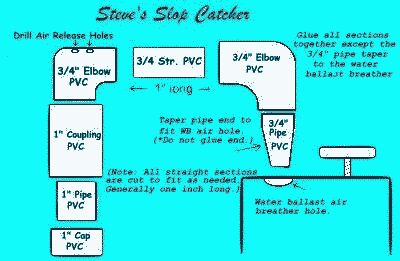
The materials list:
- 2- 3/4 inch un-threaded PVC elbows
- 1 ea.- 3/4 inch X 1 in. joiner and tapered insert (PVC)
- 1- 1 inch un-threaded joint (PVC)
- 1-1 inch X 1 inch joiner (PVC)
- 1- 1 inch (PVC) cap
- 1- can of (PVC) cement
*(I made one using 3/4" PVC for everything.
It works great in my "A" model!)
Instructions:
- Cut joiners from 3/4 inch and 1 inch (PVC) pipe.
- Glue a 3/4 inch by 1 inch pipe piece in to an end of one of the 3/4 inch elbows.
- Taper the end of that pipe with coarse sandpaper to fit your plug hole.
- Glue the other 3/4 inch by 1 inch joiner into the other end of that elbow.
- Glue the other 3/4 inch elbow on the end of the joiner, forming a U.
- Drill 2- 5/16 inch air holes in the top of the 3/4 inch elbow farthest from the plug hole.
- Glue the 1 inch joiner to the bottom of the 3/4 inch elbow.
- Glue the 1 inch cap, using the 1 inch by 1 inch joiner to the bottom of the 1 inch joint.
The "Steve's Slop Catcher" is used during the water ballast fill. Don't forget to seal and plug the WB tank as normal for sailing.
Pulling my boat from the lake I start letting water out of the WB tank with the standard plug in place. This is so water won't seep up and out now that it's tipped forward on the trailer. After preparing things for the road I pull that plug and re-insert Steve's Slop Catcher. That rides all the way home.
Tap the air hole to accept a pipe thread fitting. Properly insert the PVC fitting in the hole and then add about a foot of tube above it. This should never leak and need not be closed. Bleach can be added by pouring in the standing tube.
Tap the air hole to accept a pipe thread fitting. Properly insert the PVC fitting. Attach a very short piece then a "T" fitting. Add another short piece on top that is made to accept a screwed-on cap or a small drain clean out type fitting. (This is where you will be able to add bleach into the WB tank.)
With that portion complete, add a fitting adapter on the open side that converts to a 1/2 inch hose. From there add a length of hose. The hose squirrels around until it "T's" into the sink drain hose, and/or the anchor locker drain, (C models only).
*Option's 2 & 3, should never need plugging and act automatic. Notice I say SHOULD. That's because I've not tried it! I can envision the hose becoming clogged somehow in the distant future.
Here's something simple! I grabbed my ink pen and wrote the small word, "INSIDE", on the inside bottom of each of the two wooden hatch covers. My daughter got confused as to which direction they go. It help speed things up for me also.
Shortly after my initial cruise, I noticed the carpet got wet. Asking other owners about it I got many things to look at. Everything was a good "possible" but after checking each suggestion out, nothing proved to be the source. One thing I did find out as that the Santana was build well!
Me, being inquisitive, kept looking. Sometimes it would show up sometimes it would not. Everything seem to more damp after sailing on rough or winder days and not so much on smooth or light winded days. This made for a real puzzling problem.
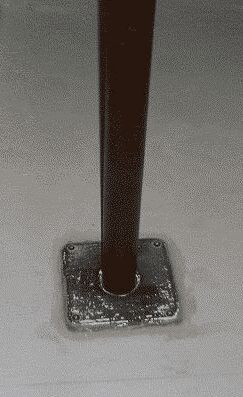
One day after being out on the water, I went below and noticed the dampness again. Pulling up the rug and drying the cabin sole revealed nothing. Then I retraced everything but without the carpet. Once again, nothing. Then I tried something new. Inserting the table-leg pole, I pushed and pulled on it. Sure enough I found the source! The table-leg pole mount on the cabin sole had a very slight crack that only showed up when side pressure was applied to the pole.
When I purchased my boat it was near four years old but still brand new! "How's that?", you say. The dealer used my boat as a model or show piece at his store and for shows. I figured that over time someone, or the accumulation of a bunch of people, climbing around in the cabin either sat on the table or bumped it pretty hard. The leverage on the base pole cracked the base. Made of fiberglass/plastic the base just sprang back into place and no one knew the better. Me, being the first true user, found out about the problem.
Applying some side pressure then forcing some seal into the base crack worked like a charm. No more leakage!
![]()
Return to Home Port.
Mail to: The WebCaptain1@yahoo.com