
The factory warns to never sail without filling the water ballast, (WB), tank. Why do you think they say that? If you were to take a clean mayonnaise jar and fill it half way with water, screw the lid on tight, then tip it about 45 degrees to the side, what happens? The water stays horizontal and the jar has a 45 degree tip. (Duh!)
Using that example should tell you that your boat would tip very easily being that no ballast is trying to hold your boat upright. Play it smart and fill the tank!
"We generally think of air as being weightless. But, the ocean of air surrounding the earth does exert a pressure. Torricelli, the inventor of the barometer, showed that atmospheric pressure could be measured by a column of mercury. Filling a tube with mercury and inverting it in a pan of mercury, he found that a standard atmosphere at sea level could support a column of mercury 29.92 inches high…" (Quoted from my 35 year old hydraulics' textbook.) These are common numbers you might hear from a weather person!
What all that basically means to us is, as long as there is counteracting pressure, It isn't going to flow.
As an experiment, the next time you go to a restaurant, get a drinking straw and push it in your Coke. Now seal the upper open end with your finger. Lift the straw a few inches but not out of the fluid in the cup. You've just made a very crude barometer.
Now lift the straw out of the fluid and hold it there. Note that much of it leaks out. You've just caused an imbalance of pressure and that is what pushed the fluid out. (Except what sticks to the straw itself and other surface tensions, but that's a another story.)
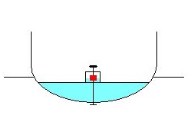
Now that your sailboat tank is properly filled, things change for the better. Note the water in the small box area where you use the crank and air plug.

As the listing becomes greater, the small upper box area, (Where the air plug is located), prevents air from getting into the main portion of the tank. Being that the small box doesn't let the air reach the main WB tank, then the pressures remain constant, (slight differences are not mentioned to keep my explanation simple).
Just like in the Barometer example above, the pressures remain constant and the water cannot be pushed out.
One thing to remember, if you tip over too much air will reach the main tank and it will leak. This could happen in ruff weather conditions or by just pitching which will cause the water to splash out the hole. Best thing is to plug the air hole and snug the lower seal.
*I sure someone can pick my choice of words apart. Basically that is how the water and tank act. Should you notice something that is very incorrect, please let me know! (No one on earth if perfect and it's getting late!)
You'll note that it's a little dirty. There are allot of floating weed towards the end of summer. Guess what gets drawn into the tank? Along with the normal water, just about everything that is close to the opening.
This is one main reason to always add bleach to the tank every time you fill it. Besides weeds, you have egg's, seeds, Zebra mussels, and other assorted nasties that I have no idea even existed!
There's always a small amount of water left inside the tank that can keep the critters alive. Being a trailerable sailboat it's easy to spread them to another body of water. A naturalist once told me that in a stagnant puddle of water it takes at least ten days to kill off Zebra mussels. If you frequent other lakes in less time it becomes imperative for you to add bleach.
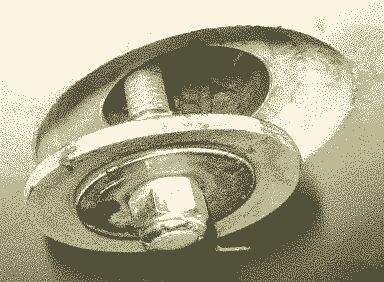
As you see the sealing area is recessed about 3/8" with tapered sides. The taper helps align the plug should it be off set as mine is. The actual gasket/seal is a round piece of rubber with an oversize stainless washer (Fender Washer) pinched together by two stainless Nyloc nuts, one on each side. You can just barely see the inner nut in this picture.
A few owners have reported that the entire gasket / washer assembly can be drawn inside the tank should you tighten the cabin's "screen twist handle" too much while closing it. This is possible but if you think about it and be careful, the rubber gasket only needs to make snug contact with the opening in order to close the hole.
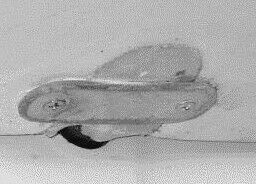
I'm not talking about just replacing a broken lifting line. I'm referring about repairing and securing the pivot pin on the swing keel. One owner found out he needed to repair the swing keel pin, (centerboard pin).
He did it a very secure way by adding a supporting brace. The fixtures holding the plate were through bolted from inside the WB tank. In order to accomplish this, he also installed an inspection port into the water ballast tank. If the port was opened, access to the thorough-bolts were gained.
The access port was placed directly above the CB Pin location. Extra support was also placed around the inner pin position for added strength for the bolts to anchor in.

This is something no one likes but it happens on occasions... water ballast tank problems. I almost don't want to include this because of the negative thoughts people have. Truth be known, most owners never experience it!
The factory designed the 2023's to be easily trailerable, this means that the WB tank normally gets drained and dries out often. Through 1996 the factory used marine grade plywood to form the WB tanks, afterwards they switched to all fiberglass.
Those who choose to leave their boat in the water the full season have a greater risk of having the inner wood begin to rot. This can cause blistering and/or a weakening of the hull. After three full seasons in the water, one owner began to develope symptoms.
Several owners had their rear stringer/bulkhead allow water to seep into the rear air chamber. From that point several others installed small inspection ports to check for any water entry. Some did and some did not find water buildup. Putting the port in permitted many owners to have piece of mind.
Ruffly speaking, get inside the tank and apply a bottom coating. That seems to be a good cure. (Be sure not to coat the threads on the fill/drain rod.)
As the WB filling gets near full, misty water bubbles out the air escape hole located in the cabin. Steve has come up with a simple and effective fix for this.
The slop catcher is a simple U shaped PVC pipe that catches the occasional water droplet that always squirts into the forward bilge on the "C" models. (*Having a different interior design on the "A" & "R" models, an droplet hits the carpet not in the bilge.)
After launching, when I am out tying up and finishing the rig, the catcher is doing it's thing. I can then go below, pull out the slop catcher, empty it, plug the hole, close the valve, and go sailing.
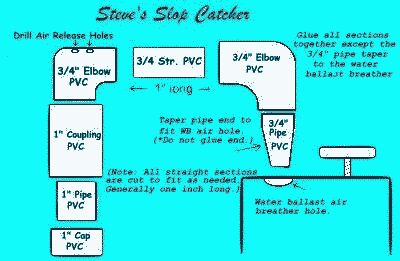
The materials list:
- 2- 3/4in. unthreaded PVC elbows
- 1ea.- 3/4in. X 1 in. joiner and tapered insert (PVC)
- 1- 1in. unthreaded joint (PVC)
- 1-1in. X 1in. joiner (PVC)
- 1- 1in. (PVC) cap
- 1- can of (PVC) cement
*(I made one using 3/4" PVC for everything.
It works great in my "A" model!)
Instructions:
- Cut joiners from 3/4in. and 1in. (PVC) pipe.
- Glue a 3/4in by 1in. pipe piece in to an end of one of the 3/4in. elbows.
- Taper the end of that pipe with coarse sandpaper to fit your plug hole.
- Glue the other 3/4in by 1in. joiner into the other end of that elbow.
- Glue the other 3/4in. elbow on the end of the joiner, forming a U.
- Drill 2- 5/16in. air holes in the top of the 3/4in. elbow farthest from the plug hole.
- Glue the 1in. joiner to the bottom of the 3/4in. elbow.
- Glue the 1in. cap, using the 1in. by 1in. joiner to the bottom of the 1in. joint.
The "Steve's Slop Catcher" is used during the water ballast fill. Don't forget to seal and plug the WB tank as normal for sailing.
Pulling my boat from the lake I start letting water out of the WB tank with the standard plug in place. This is so water won't seep up and out now that it's tipped forward on the trailer. After preparing things for the road I pull that plug and re-insert Steve's Slop Catcher. That rides all the way home.
Tap the air hole to accept a pipe thread fitting. Properly insert the PVC fitting in the hole and then add about a foot of tube above it. This should never leak and need not be closed. Bleach can be added by pouring in the standing tube.
Tap the air hole to accept a pipe thread fitting. Properly insert the PVC fitting. Attach a very short piece then a "T" fitting. Add another short piece on top that is made to accept a screwed-on cap or a small drain clean out type fitting. (This is where you will be able to add bleach into the WB tank.)
With that portion complete, add a fitting adapter on the open side that converts to a 1/2 inch hose. From there add a length of hose. The hose squirrels around until it "T's" into the sink drain hose, and/or the anchor locker drain, (C models only).
*Option's 2 & 3, should never need plugging and act automatic. Notice I say SHOULD. That's because I've not tried it! I can envision the hose becoming clogged somehow in the distant future.
Here's something simple! I grabbed my ink pen and wrote the small word, "INSIDE", on the inside bottom of each of the two wooden hatch covers. My daughter got confused as to which direction they go. It help speed things up for me also.
My '94 came with a large washer backing up the seal for the lower water ballast tank opening. The factory must have made a change between model years because I had no nylon or wood as owners of previous years reported to me.
Several owners have reported the nylon cracking. For them, it seems the nylon portion crack's. As a quick fix, a simple piece of round wood or a large washer works fine. To prevent the rod itself from turning, hold it with a pair of vise-grips. (Don't forget to periodically grease the upper threaded part located in the cabin so it doesn't "freeze-up".)
No sense tempting the honest so I got two latches to put on both cockpit seats, the kind that have room for small padlocks. Now I don't need to be AS concerned leaving the boat unattended.
Another thing came as a bonus! Now I can attach a rubber bungee cord between the two latches and after wrapping it one time around the tiller, it makes a great unattended holder for the tiller while I go elsewhere.
Several owners reported having water in their rear "positive flotation" air chamber. After much talk and lots of hard work by them, the problem has been determined, I hope! Well here are some possibles anyway.
Before 1996-7, the water ballast tanks were made of resin soaked marine plywood. Now they are protected with a coating of fiberglass on the inside. After several seasons without being pulled from the water the wood began to rot and left a hole for water to creep into the aft air chamber.
What many have done was to install an inspection port over the air chamber. This allowed them to check things as necessary.
As a side note when first drilling the hole, those that reported having some air come blowing out didn't seem to have any water in the air chamber, those that did not report any blowing air, did.
To repair it, re-fiberglassing was the only thing until recently.
Several owners are looking into a spray coating, similar to what the industries use to prevent leakage in underground storage tanks. This should work although the concept for our WB tanks has not been tried at the time of this writing.
Once the leakage has been fixed you could install a larger inspection port for more storage area, like for extra life jackets. That way you'll still have positive flotation and not clutter up the other spaces!
The jib blocks were marking up my deck while trailering so I went to my local boat store and purchased a couple stainless springs. They only cost about 50 cents each. Now they both are held off the deck close to the normal usage position and now the blocks do not mark up deck.
They didn't have a spring small enough for my jib furling block so I just took another similar size one and bent the smaller portion a little... "smaller". Now it too stays off the deck. Everything now looks like I "borrowed" them from a larger ship.
Everyone seems to puts a name on their ship and I was no exception. Going to a local boat lettering store I obtained mine. Some have painted lettering, mine is the vinyl "peel and stick" type. Now I can feel proud that I have "G Marlyn II" on both aft quarters. Later on I got some lettering from a hardware store and put my city and state on the stern.
For some reason a cockpit seat piano hinge lost its pin so I cut another from 1/8" SS rod and replaced it. I left a small amount to stick out the ends and bent them over a bit. I doubt they'll ever want to come out anymore.
Later, one of my starboard seat hinges itself broke and a closer look was needed. Ruling out my fat butt, I compared both sides. Low and behold the starboard cover was mounted about an 18th inch higher than the port side.
Until I patch and re-drill the holes lower, I obtained a few extra hinges. Being the original has lasted three years, I'll now have enough spares for over ten years. (Hey, they were cheap!)
Wondering how I could protect my nonskid deck, I heard about Aurora cleaning products and their Sure-Step for the nonskid portion. The product also provides a pressure sensitive coverage.
Following the factory application suggestions on their web site, (got mine at Boaters World), everything went well. That stuff works great and has UV protection built in to protect the gel coat!
![]()
Return to Home Port.
Mail to: The WebCaptain1@yahoo.com