Owner Seth, decided to share his findings as he checked out his swing keel / centerboard pivot pin.
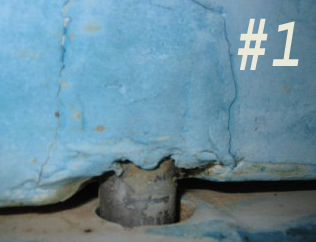
Looking at picture #1, you'll see one of methods used by the factory. The former owner never replaced the pin so that leaves me to feel they did a sloppy job of applying the finish coating.
His pin was attached differently than mine being I do not have any gel coat on top. Only epoxy was used on mine and it has a much smoother and finished appearance.
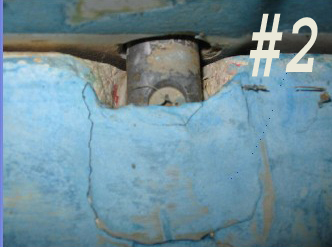
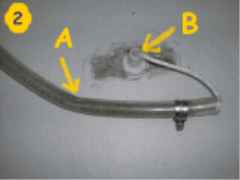
Picture #2 shows the other side of the board and the early stages of failure to the pivot pin support. (Note the cracking of gel coat.) It's a good thing he's planning to replace it.
You'll also see a portion of a stainless steel screw, (one per side), which is used to prevent pin movement and support it in addition to applying the epoxy-gel coating.


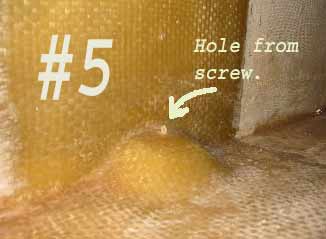
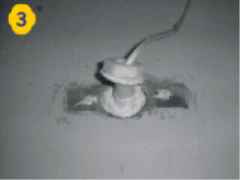
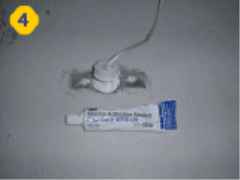
Picture #3 and #4 show the dimensions of the new replacement pin obtained from the factory with SS screws. Picture #5 shows the pin position from inside the WB tank.
Seth mentioned that some of the seal extruded when the factory set the pin in place.
It looks to me like they tightened the screw and found that it went through the WB Tank wall. (See picture #5) Having to remove the screw to apply seal and then re-installed the pin, my guess is the seal was pushed through during the second time.
*(Then too, it possible the seal was applied after quality control found the initial problem.)
Seth will likely remove the pin for inspection/replacement. If so and once out, he will work on the centerboard itself and change out the rope and pin, then rebed the screws with 5200 then cover the screw heads with epoxy.
The original pin is a smaller diameter than the replacement pin. This and improving the centerboard trunk sides may stop the pounding noise when at anchor
We wish him luck as he continues his endeavors.
The first year I owned G Marlyn, water got my carpet wet. The dealer used it as a "show and tell" boat prior to my purchasing it and someone apparently leaned on, sat on, or bumped pretty hard on the table and cracked a tiny slit at the base on the cabin sole. At the time I had nothing but silicone glue and seal to patch it and I guess it worked okay because no more water problems showed up, at least not until my sixth season. But... this was not the reason for the wet spot this time!
This time I was really listing over for a couple miles one way then the other. This went on for a few hours as I was in truly enjoying it! The wet carpet wasn't noticed until I got back to shore and started to pack things up. Later at home I search for the origin. This time it appeared to come from the step-post base. On occasions I remember others talking about water coming from the step-post base but nothing much was said about it. Looking into it, I thought I'd do my normal thing and write about it as I looked for the true cause.
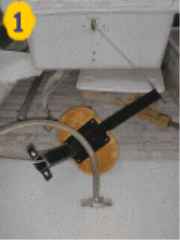
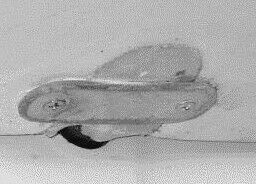
The first thing was to remove the soiled carpet, (it was falling apart from spilling bleach a couple times so I thought it was time to replace it any way.) Next remove the two small bolts and lock nuts beside the keel lifting line at the front of the cockpit. Then remove the two screws at the base on the cabin sole. Now that the square aluminum step support was technically loose, I removed it.
Getting the square aluminum step support loose, (Pic #1), took a bit of effort. Finally I got a soft mallet and smacked the aluminum. The tube broke free. I found three things inside the square "tube". (Pic #2) The lift-line, the clear vinyl plastic hose that runs the entire length of the inside, and the cause of my wet spot! It was a small 1/8th inch hole worn through the hose right at the angle of the aluminum square. (Pic #2-A) The angle is only about a half a foot above the cabin sole and the hose itself is almost 2 1/2 feet.
My finding.
I figured that over time the line wore a hole through the vinyl hose, (Pic #2), directly at the sharp angle. Something that will happen to everyone in time. The hose normally provided a simple way for the water to slosh around and then drip directly back into the lake. The hole let some of the sloshing water in the hose to leak out then the water just seeped out from under the base.
Back to the repair.
Now that I have the base through-hole exposed, I decided to reseal it also. So I loosened the nylon nut and kept wiggling it to check that it would not fall down and be lost forever. *(One day I'll install an inspection plate like several other owners have done and see what the lower section looks like.)
Not wanting to get into something I'd regret, all I did was to scrape away the old seal and put new seal around the plastic nut-base, let it set for awhile then once it skinned over, about 20-30 minutes's, I put it back on. The seal I used was 3M's Fast Cure 4000UV. It's fairly new on the market, (I think it came out in fall 2002), and is said to have a really long life to it.
Now it was just a matter of reassembling everything! When I took the old hose off the fitting on the sole, there was seal residue on the plastic. The factory likely put seal on the fitting just in case the hose-clamp loosened. Following suit I did the same with the 3M 4000UV, it makes the hose slide right on too.
The only other thing I did was to apply 3M 4000UV in the screw holes, (Pic
#3 & 4),
on the upper portion of the bolts, and around the chrome cover that fits on the
pulley. Remember not to glue or seal the aluminum base to the cabin sole. If
water should ever get in the aluminum square, (like when it rains from the
outside, the water has someplace to leak out and not fill the square.)
*One addition thing. If you feel so inclined, this would be a great time to replace the lifting line it self. When I tried at home, the boat would not get high enough for me to reach the knot on the centerboard. I had to find a company to lift my boat so I could change the line. They told me it was cheap at $1.00 a foot of boat, $23.00 total. It came to about 30 minutes from when I drove in to when I drove out.
Note 1: My original line was just under a quarter inch in diameter, (probably 5mm metric size). When I replaced it with true quarter inch diameter line it was difficult to fit it through the hole drilled through the board. I had to melt and shrink the outer braid cover so it would not keep flaring out. *(You quickly squeeze and pull the hot melting line with a rag or cheap gloves to create a hard tapering end on the last half inch of rope.)
Note 2: Just guessing but I seem to remember the line being about six feet long.
Note 3: I chose to pull the line from the top down. Knowing that any knot would get stuck at the plastic fitting, I got my sail mending needle and thread, and fastened both lines together at the ends then I put a wrap of tape around the joint. Looking at picture number 2, position "B", you'll see why a knot would have difficulty being pulled through.
Items for Swing Keel / Centerboard inner maintenance |
||
| Quantity | Description | Cost |
| 1 Small Tube | Sealant, 3M Marine Adhesive, Fast Cure 4000UV | $8.00 |
| 28 Inches | Vinyl hose, Clear, 5/8" ID x 7/8" OD | $2.00 |
| 6 feet | 1/4" diameter lifting line. (Optional but suggested.) | $3.00 |
Some owners have reported having their swing keel falling off. They all seem to have one thing in common. They tied-up, docked, anchored, etc. for a long time and left their keel in the down position.
Hearing this I suggest that if you plan to dock or leave your boat in the water while your away or sleeping, always pull the keel up. Apparently the boats rocking motion slowly fatigues the keel pin fastener method.
I'm not talking about just replacing a broken lifting line. I'm referring about repairing and securing the pivot pin on the swing keel. Pat M. found out he needed to repair the swing keel pin, (centerboard pin).
In Pat's words; "My fix was to actually cut two, four inch ports in the cabin deck floor immediately above the centerboard pivot pin. I then added a great deal of fiberglass resin to reinforce the structure of the centerboard well and re-secured the pivot pin with 4 inch #10 SS bolts. Two screw-in inspection ports from West Marine work perfectly - and have never leaked."
In addition, having installed the inspection ports, he's now able to spray seal coating inside the water ballast tank! (If he so chooses.)
Owner Dick O. found that the pin on his centerboard was showing some wear and decided to replace it. The original aluminum factory pin measured 1 inch diam. x 5 inches long and two screw holes located 3/4 inch from each end. A local machinist matched the dimensions on a recycled stainless steel outboard motor propeller shaft for him.
The pin is attached to the boat with two 2-1/2 inch long screws going through the holes. While the factory suggested that #12 SS screws were to be used, he found that #14 SS screws gave him a better fit.
On a test run, there was some vibration from the center board when the boat was heeled to starboard. He suspects that a SS sleeve should have been used between the centerboard and the screws.
Upon closer inspection, he found the original aluminium pin was almost worn through with a V-shaped notch in it. Both original SS screws were sheared off at the head.
It is suspected that the wear all started because he couldn't get bottom paint into the crevice where the centerboard would rest. Marine "crud" built up and prevented the complete retraction of the centerboard. So it was kept it down. Now with a clean bottom and the ability to retract the centerboard, it is he hopes the problem will not reappear.
![]()
Return to Home Port.
Mail to: The WebCaptain1@yahoo.com