
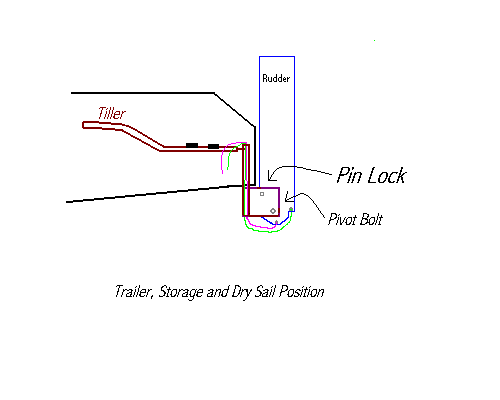
On the "G Marlyn II" tiller, only one clam cleat was mounted for Sailing and shallow water positions. For some strange reason the cleat was the kind with a closed top section. All seemed fine for the first couple months probably because I didn't know any better. While preparing to launch, I would just unscrew the wing nut from the two and a half inch long, 1/4 x 20 bolt that was used to hold the rudder in the trailer position, pull the bolt and lower the rudder about half way, remove the sailing position line from the cleat hole, fish the shallow water line through the hole and lock the rudder half way. From there proceed down the ramp then switch lines again for normal sailing. A very simple thing but a big waste of time.
The first change I made was to add another cleat. A forward one for the shallow water position and the Auto Release Clam Cleat for normal sailing. A wonderful modification.
Later that season I swapped the forward cam cleat for an open style unit. The following season I used the closed cleat on the boom when I made an outhaul. It seemed to be designed for that use. *(Besides, I hear recycling is the wave of the future!)
Whatever clamping system you have for the rudder lines, fasten the blade in the shallow water or "half-mast" position for both launching and retrieving. Unless you back into something, (not my fault!), you should have no concerns about damaging it.
As long as the water depth is enough, it's easy to just unfasten one line and pull the second line to lower the rudder.
*(I don't know about you, but I hate having to reach into the water to release the rudder holding pin!)
Twirling the wing nut off every time, and nearly dropping it, made me look for a better way to prep for a day sailing of for the road. A few months later I found a wire-spring-pin at an Ace hardware store that fit the bill.


My original bolt was 1/4" diameter. After looking the rudder over I found a slight bit of gel coat chipping around the rudder's bolt hole. The 1/4" bolt looked like it was putting to much stress on a small surface area.
If you have read most of the other pages, then you know I like to beef things up. That being so, I loosely drilled everything to fit the 5/16th diameter wire-spring pin. The larger pin has less flexing and more surface area. All that boils down to a longer life for the rudder hole. I could have used a 3/8th inch pin but the store was temporarily out of those.
Should you be wondering, the Spring-pin is 5/16th by 2-3/4" long, and has the squared bail. I tried using the round bail type but found it wouldn't clear the body of the rudder. To bad, it would have looked better.
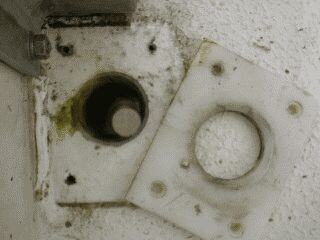
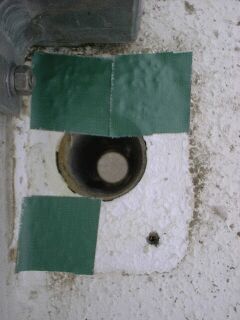
As mentioned on the yearly inspection page, check out your rudder shaft. While your at it, remove the the upper nylon cover/bushing plate to see if "yech" is developing or you have signs of problems beneath it.
Should you remove the entire rudder, post, and tiller for a winter lay up, don't forget to clean and cover the screw holes. That will help prevent water from freezing within the deck core and causing future problems.
When you replace the nylon plate/bushing next spring, put dabs of sealer in and around each screw hole then carefully around the shaft hole. This should stop, (I hope it at least slows down), water intrusion into the cockpit sole.
***Be extra careful not to put so much sealer down that the nylon plate/bushing squeezes the seal INTO the rudder post shaft hole. Once dried, the sealer will act like glued. Besides making it difficult to steer with next season, the added resistance could prematurely wear out the metal pivot and/or cause the tiller to break.
*(No I didn't screw-up and seize up my rudder post. I just thought about it and reasoned things out as you should.)
Concerned about sudden shallow waters or the possibility of the rudder hitting a rock or ???, I started thinking about alternate methods to hold the rudder down. Breaking a $500.00 rudder is not my idea of a great day of sailing. Many ideas of different break away systems ran through my head. Then "Lady Luck" hit!

While looking through an Annapolis Performance Sailing catalog, (one of many catalogs and magazines I look through for different ideas), I found a "CL257 Auto-Release Racing Mini" clam cleat advertised. It looked like just the thing I was hunting for and for less than $20.00, I had to have it. (Why reinvent the wheel?)
The salesman told me that phone orders are normally turned around in a day but I happened to want a popular item. (It was back ordered.) That didn't really bother me. In a week our family was going on a 10 day vacation without the boat. Upon returning, the mail order package was waiting for me.
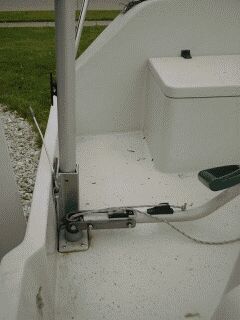
My tiller handle is an aluminum tube with the base being filled with a solid aluminum plug. Removing the original cleat was easy. Then after lining up the "auto-release" unit I found the screw holes didn't match up. No problem, just drill two more holes and mount the new cleat.
My tiller is filled solid for about eight inches into the base. It's very possible the base could bend or fatigue from the bolt mounting so the factory wisely beefed it up. After a few years during my seasonal inspection, I was looking at the rudder shaft mount and felt a little more strength couldn't hurt at that location either.
Here are a few pictures of what my rudder post looks like.

The original bolt was 5/16th and I could see that the aluminum shaft was showing some signs of wear. Well anyway I did my beefing up thing by drilling it to fit a thick walled 1/2" stainless tube.

Having installed what's called a "compression fitting", I can now tighten the bolt and not worry about any distortion or sloppy movements between the tiller and the rudder shaft.
For the winter I removed the tiller handle, the plastic collar, drop the rudder post down, remove the rudder from between the plates, clean and inspected both boat section and rudder section.
Upon looking carefully at the rudder, I found a two inch long hairline crack at the lower trailing edge corner. This crack was directly in the middle where the two halves come together. A double take confirmed the crack.
The next day I phoned the factory. Telling my story they told me to send the rudder in for warranty service. No questions asked. (Shall I compliment them now, or later?)
Jazzbeaux23 mentioned that several 2023 owners suggested lengthening the rudder. This can be accomplished by adding glass on your own. He has drawn plans to do this or you can purchase the high performance model rudder from the factory.
Taxbusterbob and crew had an exciting time during a "Force Five" regatta when his tiller itself broke off about eight inches from the rudder post. They came up with a deck broom that fit snugly in the small piece of pipe and finished the race in 2nd place, even with the bristles flying!
Steve says that the stock tiller-mounted jam cleat had a habit of releasing at the worst time. This caused the rudder to pop up in heavy winds and seas. After getting into trouble a few times he mounting the rudder cleat on the inboard side of the transom, just above the rudder post. Besides allowing a good snug line all the time, in two years he reported no signs of chafing at the post.
*A little side note, as long as I firmly lock the line in the cleat, I've had no troubles in over four seasons. Of course I don't sail in the ruff ocean waters like he does. Most of my sailing is in relatively shallow waters and I have had the rudder kick up here and there but weed build up will do that. Steve also recommends using stainless wood-like screws that are about 1/2 the thickness of the transom.
For a little extra strength, MangoMango23 mounted his with through-bolts, only using washers and no backing plates. To prevent any type of leakage consider dabbing sealer on the threads to plug the holes. Other water resistant goop can also be used.
For ease of removal for my annual inspection, I use Silicone seal around the tiller shaft bushing. This also assists in preventing scum build up under the rudder-shaft nylon cover plate.
![]()
Return to Home Port.
Mail to: The WebCaptain1@yahoo.com