Yes I do remember when my tire got a large slice in the side wall from the sharp-sided and crude ramp. Being a 50 miles away from a large town on a Sunday evening might be beautiful but it's not very good to find a new trailer tire. Getting desperate, I had to travel about 1-1/2 hours and eventually got a new tire mounted on my rim. I was determined not to be in that situation again and carried a spare ever since.
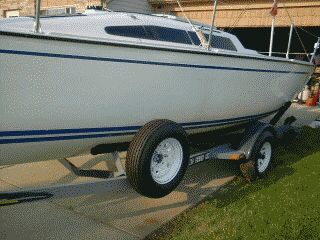
The spare tire was moved back and forth from my garage to my van. Four years later and getting tired of moving it, I looked at different ways to mount it on my trailer and came up with a good method. As for the exact spot, I tried places all over the trailer until I found the best location to mount it.
The front section wouldn't be so good because I want to be able to climb around without a tire always being in the way. On my former boat's trailer, I had a horizontally mounted spare that looked good but it collected weeds every time I submerged it at the ramp. (What a mess cleaning things up!) Similar to a 18 wheeler, I could have put the spare under the trailer but that would be difficult to get at and then, there's the seaweed problem again.
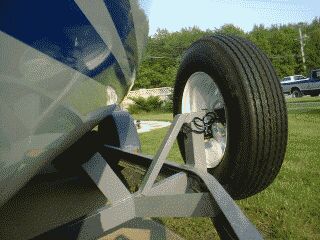
The front side was nice except with the tire wobbling around, I felt it was only a matter of time until metal failure. The best build it seemed to be vertically on the side at the front cross brace. The cross brace would provide extra support and then I'd design it so the tire would not rub or scrap the ground as I went over the ramp crests. (A common problem in the design of ramps around the Great Lakes and I'm sure in many other states.)
To start with, I gathered all the metal parts needed and carefully held them for an approximate fit. Before any welding was done, I checked the back-inside for any problems. Sure enough both the tail light wires and the brake hose were resting directly in harms way. Knowing about this I used anything I could find to hold the wires and tubing away from directly near where I was going to weld. The cross brace holes were burned in by Zieman factory to pass the things. Why not, it's cheaper and faster than drilling.
A 2" x 4" box-metal section was welded on the outer part of the main trailer frame. Afterwards I looked at the inside. The paint was burned off for the entire length of weld and about 1/2" wide. (Thanks you for remembering the wires!)
Next, I fitted the upper 1 1/2" square-metal portion that was going to support and clear the wheel from rubbing on the trailer frame. From here I welded a 45 degree support to hold the wheel mount from flexing. Then it was time to put on the final backing plate with lugs.
When I chose the lug nuts, I wanted to use the same thing that is now on the trailer axle. Then I started lining things up and realized that I'm not getting any younger. The tire/wheel assembly really gets heavy. When I was attempting to start just one of the original style bolts at the raised position, it took over five minutes! What a pain! Knowing that Murphy Law told me that what ever goes wrong, (a flat in my case), it will happen at the worst time, (right after sailing when I'm most tired). This would be difficult at best so I changed to the standard auto style lug nuts/bolts.
Note: You should not weld the backing plate on until a proper fit is obtained and the lugs are welded on. Should you mess up, it's an easy matter to scrap the one and start over. Also remember you can drill a security hole or two in the plate on a drill press. You'll need a hand-held drill otherwise. From here you know the wheel will fit on the backing plate and it's a simple matter to weld the backing plate on the rest of the mount.
Being that I went for strong but inexpensive cut-off metal commonly called scrap, (the price was right). All four different pieces of metal varied in thickness but generally were around .200" thick. I do remember it cost $7 for a pound for welding wire at Lowes, and $15 for the security lock and cable at Meyers, (The black curly thing in the center of the wheel.)
Now I don't need to move the tire each time I go out for a sail and everything looks great!
Look carefully at your trailer's bunk supports. Many owners have found the rear main support to be bent at the bottom, near the attachment point. If not bent, the paint was stressed and cracked. One owner had his collapse and fall right on the fender!
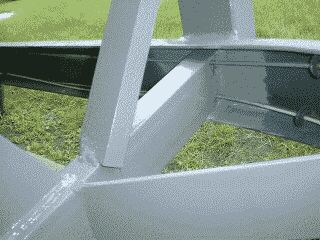
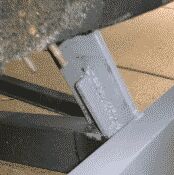
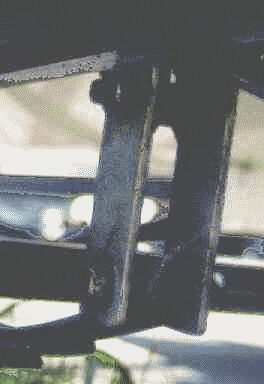
Several years ago I spotted my paint cracking. Having welded many years ago I thought I give it a try on the trailer. Looking at the picture you'll see a small and simple piece of metal I welded on the support and trailer cross member. Since then I've not had a problem with any further cracking or bending.
*Yes... I know the weld is sloppy! But figuring it was the first time in many-many years. It has worked so far! The messy weld was because of improper heat and that I was welding by scratching and then burning through the remaining paint. (Pretty dumb on my part not to clean it all the way off first.) Any future weld will not have that problem if I can help it thanks to my new grinding buddies called Mr. Black & Mr. Decker!
If anyone else is planning on welding heed my warnings, practice before doing it. It's extremely difficult to weld from underneath especially in tight quarters, practice allot, and get the weld machine controls setup by using scrap before working on the real thing! Have I mentioned to practice, practice, practice? (And don't forget to clean off the paint.)
One of the best things about the Santana 2023 is the great ability to be launched and recovered. Normally if a 16 to 18 foot powerboat is able to use a ramp, I have no problems. Not bad for a 23' sailboat!
From what I've heard, many lakes have ramps that are very much... unimproved. So I've decided to be prepared for the unknown and build a tongue extension.
W.D. Schock designed a wonderful bow-stop, winch, and ladder combination. Throwing on a built in ladder really comes in handy when you want to get a head up on things.
After checking out a bunch of other boat trailers and their method of adding an extension, I decided to construct one for my trailer that had adjustable height, could be added directly on the same factory bow stop, and was stored away for the "um-teen" thousand times I wouldn't need it.
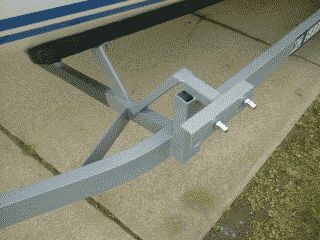
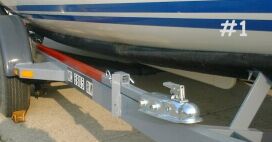
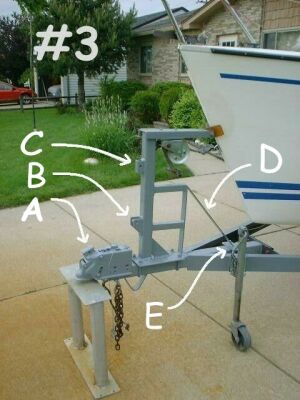
Reference pictures #1 and #3: When I designed the extension I intensionally angled the tongue as I bolted it to the bar. This was done because the mount being about 10" higher than the original tongue and I wanted it to be horizontal when positioned on the ball. As it turned out that offset provided just enough clearance for a good tight storage fit. A lucky break on my part! (See the front of the tongue how it's raised slightly above the trailer frame. )
Every hole is 33/64th inch. That gives just enough clearance to the 1/2" pin or bolt after paint, or slight misalignment, and eventually rust closes the holes. If you decide to drill holes to a large size, I suggest taking a smaller drill and stepping up in size until the final diameter is reached.
The bar itself is made from 1 1/2" thick wall square steel. I originally obtained a ten foot piece. To be safe, I supported both ends a few inches off the ground and bounce-walked like a tight-rope walker across it just to be sure it would not bend. Figuring it was strong enough to hold my big carcass, the much lighter tongue weight would be fine. Feeling satisfied I cut the bar down to an eight foot section and used the left over to act as back support to the main bar and for pinning onto the storage positions.
The bow mount also gives it the ability to be stored upright if I ever want to unhook and drive my vehicle to get some last minute supplies. Who knows, in the future I could also use it as an upright storage location to strap the mast on while trailering down the road? Right now it has so many different possibilities, I could change as often as I change my socks!
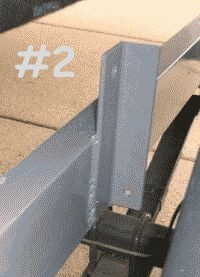
Picture number three shows the five locations I added metal. Position B is the mount for the end of the bar and pivots up and down from. Position A is where I fasten side brackets, (not shown here), which give the bar adjustability and once set, prevent the bar from pivoting up or down. For the actual pushing and pulling, positions A and B are all that's really needed.
Position C also uses the brackets like A does and is for upright storage. Positions D and E are for additional support. You'll note that E is held down with a U-clamp just like the bow stop it self. This gives me the ability to remove the entire bow stop should any future reason be needed.
As mentioned earlier, it may never be used. The parts are all organized such that nothing really looks out of place and I still have the ability to use the extension bar whenever I want!
The Santana 2023 is nearly famous for ease of use at the ramp. I have no idea how many times others boat owners have commented about this. Being so natural makes the owner think of attempting many different places to take a cruise.
In my situation I went to a couple ramps that really weren't ramps at all. Fishermen haul their small boats to the lake and over time, a launch location just happened! Other than needing to go a little further in the water I had no problems, at least until I returned.
The 2023 has a water ballast tank which needs to be filled each time you go out. After a day on the water I found out that with the tank fill the boat floats an inch lower. Because of this, I needed to back my trailer another couple feet further down the shallow ramp. No problem so far. After recovering my boat I drove to the prep location near the parking lot.
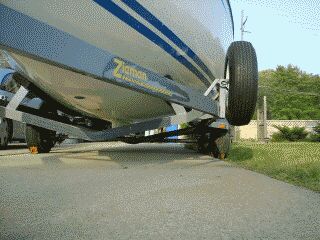
Everything went fine until I went to the tighten the final inch on the trailer winch. Looking down I saw a couple chips in my bow's gelcoat. That's when I realized that as I went further into the water, the trailer pushed my boat further out also. The ends of the trailer are normally deep enough in the water so as not to hit my boat. This ramp was so flat-like the water depth never got deep so I ended up hitting the boat a couple times.
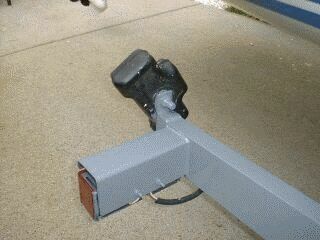
After thinking about a pad I built the trailer end bumper you see in the picture, (One for each side). All I did was get two, 1-1/2" pieces of angle iron, drill the holes, weld them on the trailer end, then bolt the bumpers on. Just about any type of bumper would do, the two I have came from a "dumpster dive". Now I once again have no problems at that area!
Concerns about the axle hitting the swing keel was reason enough for me to make a pair of shackles two inches longer than stock. This increases the distance between the axle and the swing keel roughly one inch. I can live with that. (Shades of high school Hot Rod days!) The total cost for parts, about two dollars.
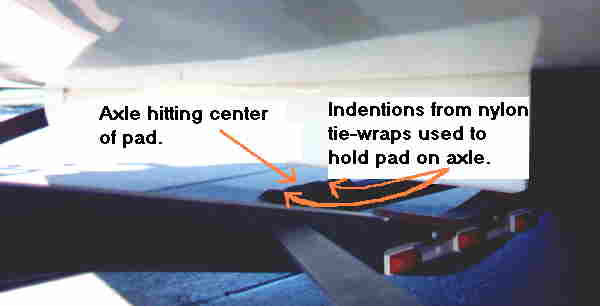
Several other 2023 owners suggested using only a rug or padding material. My answer to that was, "But it still hit's!" All that smacking could accumulate and cause future problems.
'just heard two other methods. Both do one thing, they raise the bunks. One involved putting on higher bunk board metal brackets and the other is so simple that I feel pretty dumb not thinking about it also. Just fasten another bunk on top of the other! (Be extra sure to sink the fasteners below the top board line as not to scratch the hull.)
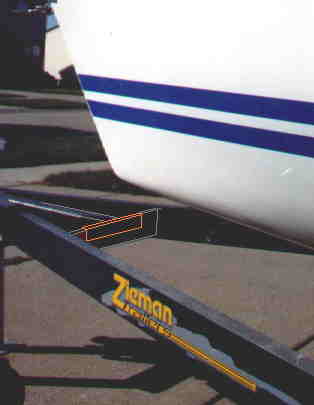
Nearly every time I loaded up after sailing, the bow ran into various sections of the trailer, (it's hard to control one handed).
One major sore spot was the front cross piece. Obtaining a hard plastic bump-stop from the factory, I mounted it. This piece prevents the bow from directly hitting metal and cuts down on tons of gel coat repair.
(This was a poor photo. I outlined the plastic pad in orange so you'll have to look carefully.)
There were contractors, (Great Lakes Railcar, Ph: 248-673-9177), that applied "Durabak" flexible non-skid on a hydraulic pump room floor where I work. They agreed to let me use some leftovers to cover the trailer area I walk on. (Note in the picture above, the light gray.)
This neat stuff is totally water proof and costs about $25.00 a quart, November, 1999 price. It comes in many colors, even Glow-in-the-dark, with or without nonskid added. (A "plug" for them!)
After work I quickly drove home hooked up my boat and returned. Removing the junky stick-on nonskid tape I put on last year, I lightly ruff up the areas with 80 grit sand paper, and started painting the walking parts of the trailer .
Gathering the gallon paint cans from the work project and a used brush, I collected the leftover from the sides and bottom. That stuff really goes a long way! It turned out to be just enough to cover the top-front of my trailer. After thinking about it, I doubt if the accumulative total was even a pint. My biggest problem was to use it before the paint started to harden, (aprox. one hour), but all turned out well.
The used brush just got thrown away but the contractors did say the coating cleans up with "Xylean", which is commonly found at paint stores. The top parts are now covered and protected against water, air, and rust!
Somthing I heard a long time ago was to put your boat's registration numbers on the side of your trailer. That way if anything ever went wrong on the water and you don't make it back, the authorities will at least have an idea if you're on the water or not! It would also help locate a
Mine letters are 2" high, reflective, and cost about 35 cents each at a local hardware store. (1998 price)
I've come to realize that my trailer is naturally flexes on the road. Now I wonder if I really am suppose to tighten the trailer winch belt as tight as the factory suggests?
If I tightening the winch strap or the rear hold down strap I added, the bow starts to raise off the front portion of the bunks. This puts alot of weight on the rear of the bunks and on the bow-eye.
Maybe I should just snug the cable strap and put a strap in the middle someplace. This makes the most sense being I have just enough belt tension to keep my sailboat from parting company with the trailer on a bumpy road.
Another thought would be to modify the winch mount itself in order to not lift the hull off the forward bunk area. Something to think about later.
![]()
Return to Home Port.
Mail to: The WebCaptain1@yahoo.com