Santana 2023 Owners & "Santa" Want-a-bies!
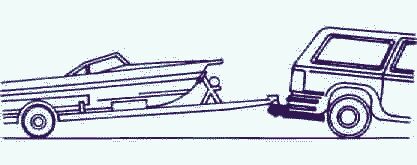
Trailering
General Trailer Information
Zieman Trailer made the trailer for W.D. Schock as
per their requirements to carry a Santana 2023 sailboat. With a few
modifications all turned out well. The trailer came with 14" wheels
equipped with Bearing Buddy's axle. Later models came with a single heavy-duty
3500 pound axle. Others tell me the earlier models, distinguished by a red
paint finish, came with a 2600 pound axle on them. Late 1993 was when the
improved trailers came off the line.
Hydraulic surge brakes and a spare tire were separate options. Mine
originally came with the brakes but not the five lug, Ford style, spare tire.
Being a 1994, mine came with the later charcoal gray paint job. All models came
with a neat step ladder-winch-bow stop combination in front with a slightly
different style. (I love it when something has multiple uses!)
Concerning the Bearing Buddy's, I only add enough grease pumps to bring the
blue indicator ring out about half way. This is because when they protrude
further out, the little plastic indicator ring could get in harms way, (again).
Once I cracked the ring when it rubbed against the dock piling. (Dumb move on
my part!) If the blue ring moves when you push on it, you can be pretty sure
there is enough grease inside.
Red Flag and Legal Lighting
The Dept. of Transportation suggest's
that a one square foot red rag be flapping out backwhile you trailer. Even
though it's *not needed on our 2023 Santana's, I put a Detroit Red Wing's
hockey flag on the mast pole. It fits the bill and looks great!
In Michigan if a pole or whatever sticks out four feet or more from
the basic body of the vehicle, it NEEDS a red flag to let others know.
*Being the boat is about 23-1/2 foot long and you lay a 27 foot mast on top,
it is less than 4' out back. When you lay a 30' mast on top, that means you
have about 6 to 7' sticking out back. Sure you can put a couple feet out front
over the bow pulpit but that still leaves abit over 4' out back.
Before I put my flag on back, I tried mounting the mast further forward. One
problem for me is, the mast was over top on my vehicle, (Ford Explorer), and
real close to hitting it. When I would travel over bumpy roads, the mast
could hit my roof. To be safe, I had to shove it back a bit and placed
the Red Wing flag on the rear mast mount pole. Het, it looks neet anyways!
About two years later, I realized that I also needed a red light for
traveling at night. Just to be legal, I mounted one and wired it up directly
off the trailer light wires.
Correct setup.
For the past several years I have assumed the lights used during road travel
were legal. Actually they are. Well... at least until you carry a tall mast on
it!
What happens at night?
Knowing about the need of a red flag out back after four feet, I didn't
think about anything else. After all, I'm a day sailor! Although I did mount a
Red Wing hockey flag out back. It looks neat and meets DOT regulations. At
night a red marker light replaces the flag. Now that's a problem. I haul around
a 30 foot long mast! For me, about two feet hangs over the bow and close to
five feet out back just waiting to smack a something high enough to reach it,
(like a big rig.)
Why have a trailerable boat and not trailer? In the near future I'll be
doing some long distance traveling. That means it is very likely I be out at
night. To travel legally, it would be easy to just run some wire with a red
light on the end, but I wanted something better and more custom-like. After
thinking about my needs, I came up with a great fix!
Note:
If you have a standard 27 foot masted 2023, you're fine!
If you're mast is longer you'll need a red flag out back during the
day and a red light at night. (At least if you store it the way most sailors
do.)
A really neat setup!
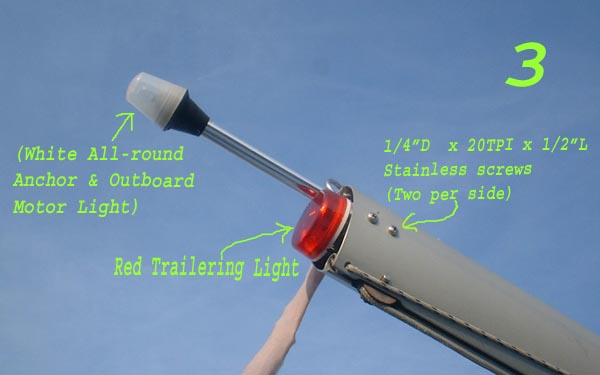
Needing a red light out back, I was going to just attach one on the mast tip
but that wasn't an easy thing to do being the mast end is so high and far
outwards. So I thought about it and came up with a multipurpose setup.
The first thing, besides the planning part, was to obtain a light that would
fit on top of my mast. TSC had just the right thing and it only cost a couple
bucks. It is a DOT approved red light with a #194 light bulb inside. (That's
the same bulb used on many vehicles so I can get replacement bulbs real easy.)
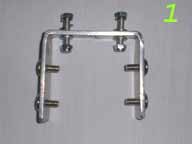
Next I found some aluminum stock
measuring 1/8th inch thick by one inch wide by nine inches long. Looking at
picture #1, you'll see the four side holes I tapped out to fit the common 1/4 x
20 x 1/2" long fastener.
The holes to hold the light and to pass the wire through were just drilled
out to fit the screw.
Remember to make the bend in the aluminum before you tap out the 1/4 x
20TPI. If you good, your can do the drilling first but if you just put the
aluminum in a vise to hammer the bend in the blows may mash the threaded
portion. Also you'll find that a slight twist in the sides will fit better in
the mast.
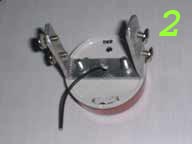
Now you can
drill four matching holes at the top of the mast. As you screw in the 1/4 x
20's, fish the wire down the center of the mast to the base. Two wires will be
for the red lens for traveling and two will be for your anchor and all-around
white light.
If you wish, one of the screws can be used to support the wires. That way
you shouldn't need to be concerned about the wires/cable tearing away from the
light fixture.
At the base you need to drill a hole to fit the electrical bulkhead
connector. Attach the red marker light wires to half of the connector pins then
the other two will be used for the anchor light.
Hook up a few feet of wire from your trailer's main running wires, (likely
the brown and white colored two), to the lower mast connector and you'll have a
red light as you drive the roads at night.
Do you understand what is happening yet?
What is happening is; when the mast is laying down, you can easily plug-in
the connector from the trailer. Now the red marker light will be lite whenever
your lights are on.
When the mast is stepped up for sailing and the other two wire connectors
being used, you're able to connect for the anchor or white all-around light on
top of your mast. This is all done through the same connector and the red
marker light will not become light up or even be noticeable. Pretty neat!
Parts Listing
|
| Description |
Quantity |
Price |
| Side Marker Light, red colored lens |
1 |
$2.50 |
| Aluminum Bar, 1W x 9L x 1/8"T |
1 |
$5.00 (?) |
| 1/4 x 20 x 1/2" Long, stainless screw |
4 |
$2.00 |
| Screw to fit mounting hole in light casing |
2 |
$0.40 |
| Washers, lock, Nyloc nut to fit casing screw, 3/4" Long |
2 each |
$1.00 |
| Wire anchor, To hold weight of wire without it pulling out. |
1 |
$0.10 |
| Four wire cable, 40 feet long |
1 |
$20.00 |
| Electrical Bulkhead Connector, 4-wire type, (variable $) |
1 |
$10.00 |
| Electrical Connector, 4-wire type, (variable $) |
2 |
$20.00 |
| Nylon straps, (optional) |
12 |
$1.00 |
|
|
|
Watch those Impact wrenches!
In the past I've changed many a tire for other people
on cars with an impact wrench. Having problems myself I always used to just
snug the lugs then hand tighten them with a manual wrench. Then be sure to tell
them to beef it on because YOU might have to remove it later on the side of the
road. (Only had one person ever told me to just tighten it and not worry about
"tomorrow". )
I highly recommend lightly coating the lug threads with a good water
resistant grease. (The newer wheel bearing greases are fine.) Be sure NOT to
drop the nuts in the dirt, or put TOO MUCH grease on the threads as it may
fling about and make a mess or worse yet, find it's way onto the brake linings!
Should you remove your trailer lug nuts, remember that along with proper air
pressure it is equally important to re-torque them all a few miles down the
road, then later, and then much later again, especially for heavier
boats/trailers.
If you want some numbers, most full size wheels take around 60-90 ft/lb
torque dry depending on the type wheel/lug assembly you have. After putting a
thin coat of grease on the studs lower that figure about 75%. In other words,
divide the dry torque number by four then subtract that number from the
original figure. (Example: Original was about 95 pounds/feet. So 1/4th of 90 is
about 20-25, so you subtract that from 95 and end up with about 70 pounds/feet
of torque.
Even if you choose not to "wet" the threads be sure to re-torque
the wheel bolts after say 5 to 10 miles down the road, then again re-torque
them around 25 to 30 miles. Then again around 50 to 100 miles. If any where
found to be loose, do it again another 50 to 100 miles later.
The next time you trailer, check them prior to traveling while still cold.
Just like the tire pressure, check when cold! After this ritual you should be
all set until next year.
If you don't have a good torque wrench get a half inch breaker bar with the
proper socket. My bolts fit a 3/4 inch inch socket, (19 MM if you only have
metric sockets.) I also recommend using a six point socket instead of the 12
point type.
Basic Hitch Information
Have you ever had a trailer that just didn't feel right as you
towed it? Here's something to think about, get things as they should
be!
- Be sure your trailer is matched to your boat, how much "class" do
you have?
- Properly spaced supporting bunks or rollers.
- Is the suspension up to the demands? For that fact, are the axle(s),
bearings, and trailer frame strong enough?
- Are your tires correct for the complete gross weight? Also note that true
trailer tires normally take more air pressure, (PSI), than your standard
vehicle. The maximum air PSI, (measured when the tire is cold or less than 5
miles from first use), will be molded on the sidewall of the tire.
- The trailer ball shank must be matched to the platform hole diameter size.
Standard hole sizes are as follows:
| Class 1 |
3/4" dia. |
| Class 2 |
3/4" dia. |
| Class 3 or 4 |
1" dia. |
- Match hitch to the gross trailer weight
| Class Hitch |
Gross Trailer Weight |
Tongue Weight |
| 1 |
Up to 2,000 lbs. |
Up to 200 lbs. |
| 2 |
Up to 3,500 lbs. |
Up to 300 lbs. |
| 3 |
Up to 5,000 lbs. |
Up to 500 lbs. |
|
(On a class 3 hitch raising to 7,500) |
| 4 |
Up to 10,000 lbs |
Up to 1,000 lbs |
|
(Weight distributing systems can be used) |
| 5 |
Up to 20,000 lbs |
(Useable on pickups only) |
- Be sure your towing vehicle is up to snuff.
- Transmission beefy enough for the job, (need a cooler?)
- Engine oil cooler needed?
- Brakes powerful enough to stop everything?
- Tires and suspension okay, (sized for the extra demand)?
- Your not driving a "rust-bucket" around, (things could fall off).
- Electrics work with the added trailer lighting, (add a heavy duty turn
signal flasher).
- Nothing is loose or broken, I hope!
- How's the weight distribution
- Vehicle and sailboat should be horizontal to the ground. Too much trailer
weight forward can cause your vehicle to difficult to steer. Too much trailer
weight rearward can cause your vehicle to wiggle or fish-tail and could tend to
lift the rear wheels off the ground reducing traction.
- Theres a big debate about what percentage of trailer tongue weight you
should have on the vehicle hitch but generally it is about 5 to 12%. Some
vehicles list a maximun tongue weight for the rear. Test things out and see for
yourself.
- Santana 2023's have self draining cockpits while on the water. After a
rain, check if any major buildup is inside your boat that could change the
percentage of tongue weight. Water buildup could also overload your trailer
springs causing the axle to hit the keel. Be sure the drain holes are working
properly.
- Simple weight shift changes can be made by moving things around in/on the
sailboat. Perminate changes are possible by moving the bow stop, or sliding the
axle on the springs, etc. *Please note: This could messup the alignment! Unless
you know what your doing, leave the axle/spring assembly alone.
- Go to truck scales, grain elevators, metal and paper scrap turn-in places
to get your correct weight. If time is on your side, detach the hitch to get
the tongue weight.
- Safety notes:
- Are your chains hooked up correctly? If possible cross them.
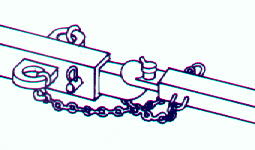 Be sure you have enough room to turn sharp
without binding the chains.
Be sure you have enough room to turn sharp
without binding the chains.
- Attach the "S" hook from underneath if yours is built that
way.

- Can you see things behind you? (Might need extension mirrors.)
Electrical Plug Pin-out Information
Here's a link to
Mark's RV Supplies. He show's
electrical wiring code for several type of connectors including the flat four
pin used on most boat trailers.
You'll see the 4 wire flat plug at his site but being that it is most common
I'll show it here also.
| White |
Ground |
| Green |
Right Turn & Brake Lights |
| Yellow |
Left Turn & Brake Lights |
| Brown |
Tail or Running Lights |
Ground wire
Most trailer lighting problems always come from
something dealing with a bad ground wire. It's a very good idea to run two
extra wires all the way to the rear lights, (one per side). That way the ground
won't depend on rusty connections on the trailer to complete the electrical
circuit.
Bearing - Seal - Spring data
If your Santana trailer came with a Bearing
Buddy axle, (most did), Here is the list for replacement parts.
|
- |
Axle Load Capacity
(*5 lug uses Ford pattern wheel) |
Inner
|
Outer
|
Inner Seal |
Cone
|
Cup
|
Cone
|
Cup
|
- |
| 1500# - 2300# |
L44649 |
L44610 |
L44649 |
L44610 |
- |
| 2600# |
L45449 |
L45410 |
L44649 |
L44610 |
- |
| 2900# - 3750# |
L68149 |
L68110 |
L44649 |
L44610 |
P/N: 32372
(made in Germany) |
| 5200# |
6 Bolt |
25580 |
25520 |
LM67048 |
LM67010 |
- |
|
8 Bolt |
25580 |
25580 |
14125A |
14276 |
- |
| *Note: Some of the seals listed here may be
"thinner". Change them to stock if you have any question about
them. |
| |
CR=16657 |
| |
Nation=473317 |
| |
NOK=AD2527E |
| |
Transcom=168233 |
| |
Victor=47319 |
| Leaf Springs |
|
| |
26 inches Center to Center |
| |
Rated 2250 pounds for both (1125# each) |

Return to Home Port.
Mail to: The WebCaptain1@yahoo.com