Santana 2023 Owners & "Santa" Want-a-bies!
Setup / Take Down

Almost ready!
Except for filling the water ballast tank, It's ready to go! This picture
shows my wife Martha holding bow. Note how low the lake water is!
Also be sure you don't drive the trailer off the end of the ramp when
launching or retrieving.
Turnbuckles - "George's Dual Boot"

The
first time I stepped my mast, a shroud turnbuckle became jammed and bent. That
cost me $20.00 to repair. After raising the mast the first time the following
year, another got bent. That cost $10.00. I'm proud to say that I finally
learned to check them out before stepping the mast... I hope!
After the first time I wrapped both upper and lower turnbuckles together on
each side with rigging tape. It worked for the season. Next spring the tape was
in need of replacement but like a dummy, I used it as-is, (bad idea). Then I
found a couple Velcro wraps that fit around just right. All you really want to
do is have both pair rise together.
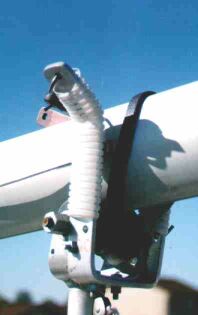
After becoming fed up with the needless bending I came up with
"George's Dual-Boot", (I know... it's a stupid name but my ego got
the best of me!) This turned out to work without fail! As you see it's very
simple, made to match my simple mind! They hold the turnbuckles together when I
raise the mast. That way I don't end up with a bent turnbuckle. For the last
few years they have worked extremely well! I recommend using similar for anyone
else who has a possible binding problem. As a bonus, if I ever get a "deck
sweeper" they will provide snag protection.
*As a side note; several other type sailboat owners tried my cover and
reported great results! (Maybe I should market them?)
Mast raising & seasonal alignment
(Tuning the mast)
Four hundred pounds! That might be what the
"purest" say's you have to apply as preload to your shrouds or
forestay. Well I'm sorry, but I don't have a measuring device at hand.
Each spring before the first cruise, I make sure the mast is setup the way I
like. Here is a simple, all though time consuming method. After talking things
over with the factory, I've found it to be the best way.
- Point the ship/trailer as best possible into the wind and while on the
trailer line-up the ship's deck/water-line horizontally with the horizon using
the tripod wheel. (Yes I know your suppose to rig the mast to the true water
line but it's close and as I mentioned before, I'm not a purest!)
- After you level the boat and assuming you are still wrapped up for
trailering on the road, unfasten the mast and all tie wraps and/or bungee cords
in preparation to step the mast.
- If you are using the factory supplied mast-raising system, (highly advised
to get or make one), attach the side anti-sway lines from the deck and to the
mast. *(Sometimes they prevent the mast itself from sliding into the
aluminum-base tabernacle brackets. In this case you may need to attach the line
to the mast afterwards.) Now insert the gin pole at the mast-base through hole
at the very bottom. (The one about an inch from the bottom.) Now attach the
topping lift line to the gin pole end. (I have a clip at the end of the topping
lift line so I don't need to tie it everytime.)
- If you don't have the mast raising system you'll have to get physical and
lift the mast up. It's quicker but tricky to fasten the forestay without
assistance from a second person. You DON'T want to have the mast fall!
- If you do have a raising system continue by attaching the Main Sheet block
assembly. (See photo #3.)
- Begin stepping the mast by pulling the main sheet until the mast is about
half way up. (See photo #1) Stop and be sure all the shroud turnbuckles are not
going to become bent. (See write up below, "Nit one, Pearl two...")
Should the mast start to move sideways, you should be able to counter sway it
by pulling the gin pole the opposite direction. What ever happens, hold on to
the gin pole keeping it as vertically lined up as possible. (See photo #1) If
the gin pole bends too far to the side, it could break off at the base and the
mast will fall.
- *(Over time I've found that pulling the main sheet from the cockpit allows
me to rest the mast itself on my shoulder and raise everything mostly by the
main sheet line and partially with body strength. This method does require
climbing up on the cabin top but it sure helps in preventing the mast from
swaying sideways.)
- Check that the shrouds aren't binding or that the turnbuckles aren't going
to bend, then continue pulling the main sheet until the mast is properly
vertical. (See photo #2)
If you don't have a gin pole to assist in raising the mast, you'll need to
fasten the forestay to the forward lever, (I refere to it as a "Knife
Switch"), to prevent the mast from falling. Do not pull the lever down and
snug things.
If you do have one, it will hold the mast up untill you get up forward. Again,
do not snug thing yet.
#1 Most of the time the gin pole can be
used to keep the mast from swaying sideways.
|
#2 Be sure turnbuckles & shrouds are
not going to jam. Use George's Dual Boot covers to be sure!
|
#3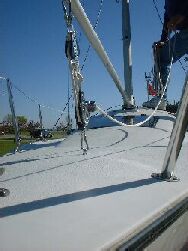 |
Using the gin pole during mast raising is accomplished quickly and
easily.
1) Once you get the mast ready for raising with the topping lift attached to
the gin pole and the main sheet block assembly attached to the deck, (something
like in pic 3), start pulling the main's sheet block to lift the mast (see pic
1). Also note that the side lines are hooked up for lower position sway control
and will become slack the higher the mast is raised.
2) Now that it's all the way up, (pic 2), snug the main sheet unit just a
little, (pic 3).
*The extra snugging bends the mast tip forward just a little, which assists
attaching the furling unit at the bow.
|
- Climb to the ground and look things over. The mast should now be directly
perpendicular. You might need to make slight visual corrections. (E.G.: The
2023 might be angled to one side or the other while in the trailer.)
- Once there, I attach the forestay line loosly to the "knife
switch" lever mount up front.
- Adjust the shrouds as needed in order to obtain a perfectly straight pole.
If you desire a mast rake, this can be applied now, as long as all cables are
loose but firm.
- Run around and look things over from about 50 yards away and at 000, 090,
180, and 270 degrees or the best you can do. Check that things are truly
straight. (The distance gives you a better overall look.) Have a
"friend" do the running around and report the findings to you or
vice-versa.
Now that everything is looking great, your ready to begin tuning.
- First thing here is to remember to remove the topping lift and gin pole if
you're using them, leave the topping lift line loosely attached somewhere else.
- If not done before, attach the forestay/furling unit to the "knife
switch" mount (You know, that 1/4" black aluminum bar on the bow
section.) When you hook them together note the distance from a loose forestay
to one fully fastened and bolted in place. This distance should be only three
to four inches of forestay wire pull. That's the loose-to-tight distance you're
trying to maintain. (Remember 3 to 4 inches).
- Loosen then pull the "knife switch" until the forestay just
starts to get snug. This is the starting point. (Do not have the topping lift
snug to anything. It could add counter-pull.)
- Tighten the lower shroud turnbuckles first and evenly by hand. Not even
with a hand wrench unless it's jammed.
- Go around and check for a straight pole.
- Now tighten the upper shroud turnbuckles by hand.
- Go around and check for a straight pole.
- Repeat steps 2 - 6 until your happy.
- Now you'll have to tighten the upper shrouds a little more than the lowers.
This might take a small hand wrench.
- Everything should be looking good except for forward mast bend. Remember
the 3 to 4 inches I mentioned in step one? When everything has been completed,
look at the forestay end. The distance between firm and bolted down should be
3-4 inches. Another thing is that you should never use a pipe or some kind of
leverage to force the "knife switch" down in order to place the bolt
it. If you cannot pull the "knife-switch" into boltdown position by
hand the shrouds are to tight.. Three to four inches is about the maximum you
can pull by hand. Once your able to lightly mussel the switch into position,
your set.
- Hopefully finished! Now secure the turnbuckles with ring clips, rigging
tape as required, and something to hold the turnbuckles together so they won't
get bent during the stepping process. I found that a 2 1/2 inch spiral tube per
side, works very well holding both turnbuckles together.
The three to four inches, listed above, is what gives you the desired
forward mast bend above the spreaders.
During a sail you'll notice the leeward shrouds getting loose. During a
strong blow you'll see the leeward shrouds really get loose. This is okay as
long as you had 3 to 4 inches of snugness on the forestay during your initial
setup. The shrouds may stretch abit. If the "knife switch seems to be
getting loose go to a mounting hole further out to give you the correct feel
again.
Quick Rudder Pin


Twirling
the wing nut off and nearly dropping it every time, made me look for a better
way. Several months later, I found a "wire spring pin" at a local
hardware store that fit the bill. (For more on that, click on the Rudder page.)
Mast Crutch Modification
The original mast crutch had a "Y" looking
piece of marine plywood that the mast was set in during trailering on the open
road. Every time I would slide the mast during setup and take down, the crutch
would shake considerably. My fear was that it would fatigue the mounting
screws.
After coming up with a roller modification, I removed the plywood and got a
friend from work to aluminum weld my roller bracket on the pole. Then I put
some silicone grease on a long 1/2" bolt and secured a three inch black
bow-roller in place. If the black roller ever marked up the mast I would switch
over to the more expensive amber type.
Having a roller on the pole was great
for a year then one day when single handling the mast, and having to set up
abeam 20+ knot winds, the mast blew right off the roller as I walked the mast
base to the tabernackle. The mast bounced on my engine cowling! Ouch! Thinking
it was a fluke, I lifted it back up then slowly started rolling it back again.
Wham! Smack dab on the cowling again. I lifted it back up but this time I
decided to not go out. As I started to put it away the mast rolled off again
and hit the engine again for the third time! (Why I didn't get any scratches on
the cowl I'll never know!)
From what I could guess, the wind actually blew my 30 foot mast to the
leeward side of the roller then as I was rolling it, the mast actually rolled
up and off! Before my next outing and before major damage occurred, another
modification was needed!
At the time my welder friend was not around. Upon closer look at the picture
you'll see my final bolt-on extensions. They're sort of like raised wings. To
prevent scratching the mast, plastic electrical conduit cover them.
The top is fine now but the base of the stand is becoming loose even after
snugging the screws down. It looks like I'll need to add some through bolts in
the transom.
*Note: A year after I first wrote this, the already loose screws failed.
Through bolts are the only way to go. Make the change now before your screws
give out!
Spreader Bar Warning
When prepping for that trip home be sure not to wrap
the upper shrouds to the mast in such a way as to cause the spreaders to bend
upwards.
When you raise the mast, the shrouds will naturally pull the spreaders down
abit. Constant flexing could cause the spreader bar itself to fail. So don't
forget your annual inspection!

Return to Home Port.
Mail to: The WebCaptain1@yahoo.com